Thursday, December 24, 2009

post number 32


I got one of my spare engines from Tim Spacke today. It is really nice! Thanks Tim!


Here is what the bottom end looks like all tore apart, you can see the inner and outer flywheels, which are held in place by a big ball bearing and a pin.


Ryan polished all the bs off of my spokes yesterday. They turned out well.

Wednesday, December 23, 2009

post number 31


Christmas came early in south dakota today. I got my spare set of cylinders from Tim in california. I bought two extra motors and a spare set of cylinders from him. They are really nice.


Here is a pic of my fly wheel being machined I bought a set of jd wheel blanks from Paul Osbourne. I have them roughed in, but still have a lot of machining to do!
Here is the blank before any chips were made.


Thursday, December 10, 2009

Post number 30


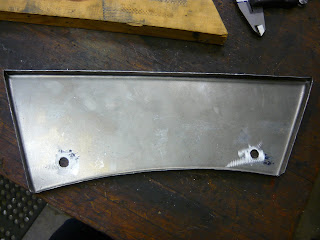
The top piece is the blank for my toolbox door. The length of the lip that has to roll over the .125 drill rod is .350.


Here is the piece after it was bolted to the buck and the edges were bent over. I need to refine my lay out of the edges so that the corners do not overlap each other when they bend over the rod.


Here is a pic that gives you an idea of what has to happen to make these edges. It is a lot of work, but very rewarding.

post number 29


In this pic both ends are done, I still have to do the long pieces though.


In this pic I am making the last hinge piece. I made the toolbox door out of metal that was much thicker than original. I didn't notice it until I had my material cut out and bent. OOPS! So consequently I had to make the hinge pieces out of a heavier gauge metal so that they lined up with the rolled over edge. In hine sight this probably works to my benefit because I have a much sturdier door, and hinge assembly. Please note the vice that I am using, I made it in high school.


Check it out!


My buck is on the left, the original cover is in the middle, and the one I made today is on the end. It is really heavy duty! I am really satisfied with the end result of this project!

post number 28


These are the shafts out of my friend Marty's top fuel motor. It made 800 horsepower. He kept pulling tapers, so he made up these hex shafts, and cut hexes into the flywheels with an e.d.m. He couldn't true the flywheels, so the machine work had to be 100 percent accurate. This is a cool idea that I might adapt to the sears.

Tuesday, December 8, 2009

Post number 27


Here is the piece of aluminum that I used for making a buck to bend over the edge of my toolbox door.


It is scribed out in this pic, and the two straight lines are milled out.


Here is the finished part, I still have to drill and tap some holes to hold the material in place.


The piece of wood will be bolted to the buck and hold the piece of metal down to help form a nice sharp edge. I am tired and going to bed.

Friday, December 4, 2009

AHHHHHHHHHHHHHHH!!!!!!!!!!!


I tried to take my flywheels out of the cases yesterday. It was miserable! There are two sets of flywheels, and It is very awkward to say the least. I am kind of stuck on this step, but I will get it.


In this pic you can see the inner pinion flywheel, and the outer sprocket flywheel. I cannot seam to get the sprocket side flywheels separated. This is a real challenge! Check out the articulating rods. What a bizarre set up!

Tuesday, November 24, 2009

post number 26


My intake towers were really pitted up, so I spent some time sanding them down before I send them off to get nickle plated. They turned out pretty good, there are some little nooks and crannies that I still have to get in, but the Pat can handle that.


HEre is my float bowl, it had three holes rotted in it. I brazed it up and metal finished it back down. It still has to be plated.

Monday, November 23, 2009

post number 25


UH OH! my front cylinder has issues. I do not want to ride across the country wondering when this cylinder is going to let loose. Does anybody have a spare 1914 front spacke cylinder laying around? HELP!


Here is the cam set up on my sears. It is really neat. I will have to shoot a video of it in action.

Sunday, November 22, 2009

post number 24


This is Tim Petereson, he pinstriped the wheels for my sears and the rims for a 45 bobber that I am working on this weekend. I have known tim since I was 5 years old. I am very happy to have him be a part of this project.


Here is a close up of his work. It is perfect!


This is the rim for the 45

Wednesday, November 18, 2009

post number 23


I got my motor from fed ex today. It turns over and is in pretty good shape. I think that it is pretty worn out.


HEre it is with the frame, fork, handlebars, and motor installed.


This will be my view for two weeks next september as I race across the continent.

Monday, November 16, 2009

post number 22


Here is the material for the toolbox. I ran into a little snag with a little later on. The pieces that I sheared out were to short.


Here are the strips laid out for folding over. I had to pie cut the corners for clearance.


This is how I got set up for bending the lip over. It took a long time.

In this pic both sides are folded over. The long sections took a while to do, I had to do three or four set ups for some. I am sure there is an easier way to do this, but it worked pretty well for my first time.


post number 21


I rolled the toolbox over this chunk of big aluminum to get the radius.


Here is the radius on top of the out line.


Roger and I made a miscalculation when we were shearing out the material for the toolbox this morning. I had to make a piece and weld it in. It turned out pretty good, and will be undetectable once the piece is painted. I learned a lot with this project and had fun at the same time.


Here is the finished product. I have to stop by the welding shop tomorrow to pick up some material for the left side. I am not sure how I am going to do the right side yet, but we will figure something out.


post number 20


I got the rest of my front end pieces in the mail today. They are for an indian, which is a lot like an excelsior, which is a lot like a sears. Hopefully I can modify them to work on my project with out a lot of work. It will take some "doing" but it is easier than making them from scratch or trying to find old rusty originals.

Sunday, November 15, 2009


Well, i finished up the fender mounts for my sears today. Here is a pic of them getting cut out. I drilled a hole in the valley where the arrow is. This worked well and made cutting them out easier.


Here are the finished pieces, I scrapped one piece. I surface ground them to make them easier to nickel plate.


Here they are mounted on the frame. I made the bolts today too. They are really nice.

Saturday, November 14, 2009

post number 18


Here is the steel that I started with for the primary cover for my sears. I don't have much experience with this type of work, so I figured that I might scrap 2 of them trying to make 1. i only scrapped 1, so that is a good deal!


here they are cut out and ready for some mill work. I used tin snips to cut up the blanks, it took forever.


Here is a pic of cutting the big hole on the rotary table.


And the little hole!


This is the one that I scrapped, I tried to bend the edges over on the buck with out cutting slits in the radius sections. The metal needs a place to go. I guess it is all part of learning. Check out below to see the rest of the steps!

post number 17


I had to cut wedges all along both radiuses to allow for shrinking. I cut the slots to outside diameter of the scribed line, and they ended up being to short.


Here is a pic of the front after the slots are all welded up and filed smooth. This is a really good job.


Here is the cover on the buck. I have no previous experience with this type of work, and I am very happy with how my first attempt turned out.


Check it out! I have to weld a strip all along the edge to get the proper height. I am going to do the tool box for my next sheet metal project! Wish me luck!